 |
|||
|
|
|||
|
|
|||
| ||||||||||
|
|
 TM 9-2320-366-20-2
CONTINUITY TEST
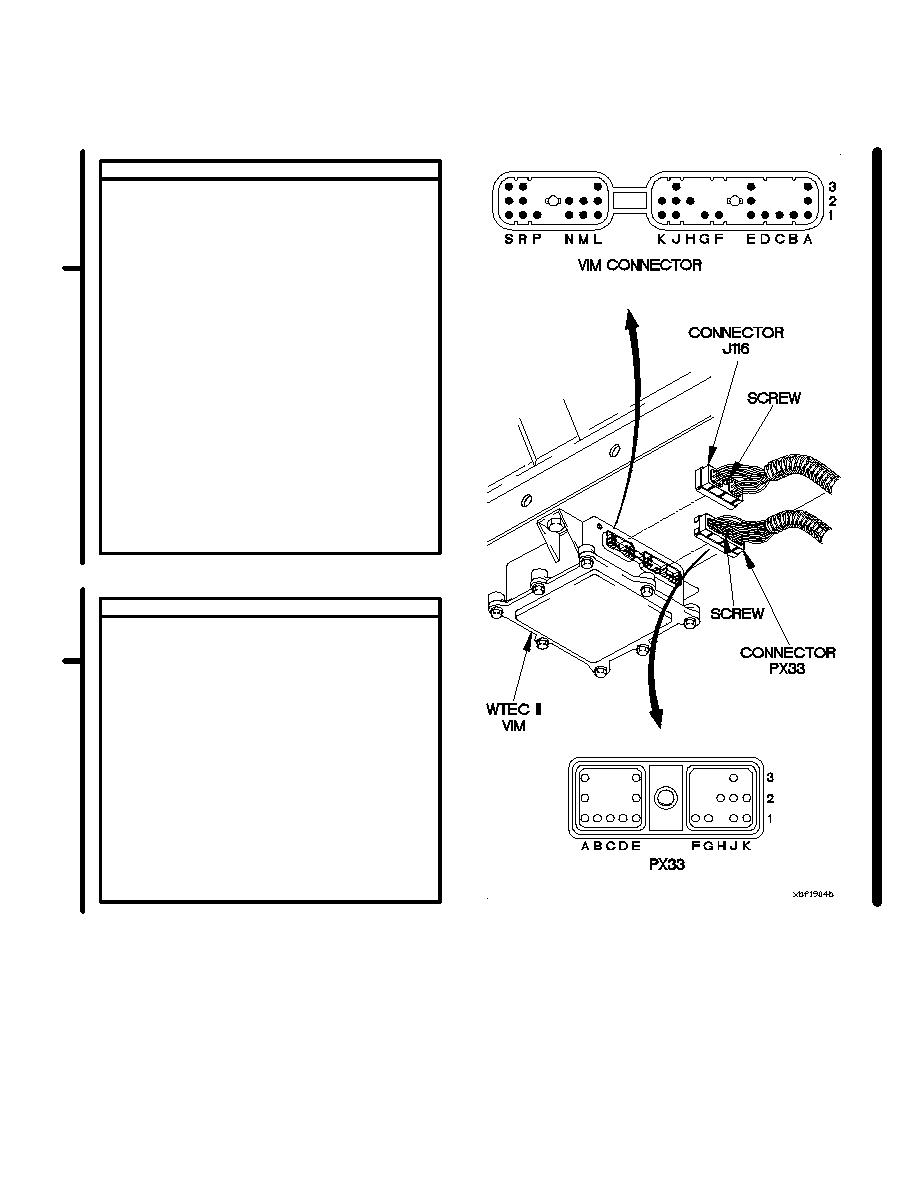
(1) Loosen screw in connector PX33.
(2) Disconnect connector PX33 from WTEC II
VIM.
(3) Set multimeter to ohms.
(4) Connect positive (+) probe of multimeter
to connector PX33-K1.
(5) Connect negative (-) probe of multimeter
to ground and note reading on multimeter.
(6) Connect positive (+) probe of multimeter
to connector PX33-K2.
(7) Connect negative (-) probe of multimeter
to ground and note reading on multimeter.
(8) If continuity is not present on connector
PX33-K1, repair wire 3101 (para 2-45) or
replace WTEC II dashboard cable
assembly (para 7-10).
(9) If continuity is not present on connector
PX33-K2, repair wire 3102 (para 2-45) or
replace WTEC II dashboard cable assembly
(para 7-10).
(10) Connect connector PX33 to WTEC II VIM.
(11) Tighten screw in connector PX33.
CONTINUITY TEST
(1) Loosen screw in connector J116.
(2) Disconnect connector J116 from WTEC II
VIM.
(3) Set multimeter to ohms.
(4) Connect positive (+) probe of multimeter
to WTEC II VIM connector pin L1.
(5) Connect negative (-) probe of multimeter to
ground and note reading on multimeter.
(6) Connect positive (+) probe of multimeter
to WTEC II VIM connector pin L2.
(7) Connect negative (-) probe of multimeter to
ground and note reading on multimeter.
(8) If continuity is not present in steps (5) and
(7), replace WTEC II VIM (para 8-6).
(9) Connect connector J116 to WTEC II VIM.
(10) Tighten screw in connector J116.
(11) Install kick panel (para 16-3).
Change 1
2-1705
|
|
Privacy Statement - Press Release - Copyright Information. - Contact Us |