 |
|||
|
|
|||
|
|
|||
| ||||||||||
|
|
 TM 9-2320-366-20-1
CONTINUITY TEST
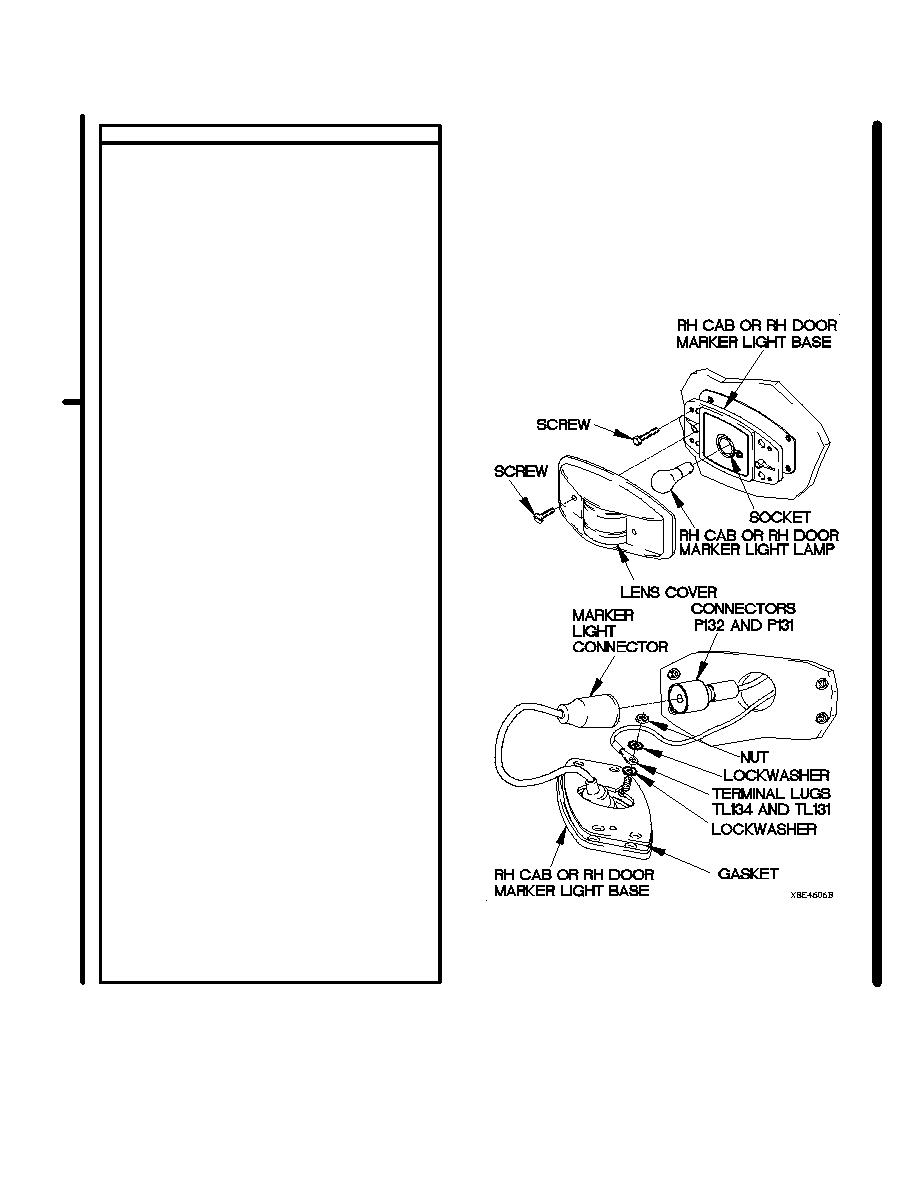
(1) Remove two screws and lens cover from
RH cab marker light base.
(2) Remove RH cab marker light lamp from
socket.
(3) Remove four screws from RH cab marker
light base.
NOTE
Do not let wires slip through hole into cab
structure. If wires slip into cab structure,
vehicle will need further disassembly to
retrieve wires.
(4) Remove nut, lockwasher, terminal lug
TL134, and lockwasher from RH cab
marker light base. Discard lockwashers.
(5) Extend base and disconnect connector
P132 from marker light connector.
(6) Remove gasket from RH cab marker light
base. Discard gasket.
(7) Set multimeter to ohms.
(8) Connect positive (+) probe of multimeter
to terminal lug TL131.
(9) Connect negative (-) probe of multimeter
to terminal lug TL134 and note reading
on multimeter.
(10) If continuity is not present, repair wire
3096 from terminal lug TL131 to terminal
lug TL134 (para 2-45) or replace RH door
and cab marker lights cable assembly
(para 7-64).
(11) If continuity is present, replace RH door
marker light (para 7-38).
(12) Install gasket on RH cab marker light base.
(13) Connect marker light connector to
connector P132.
(14) Install lockwasher, terminal lug TL134,
lockwasher, and nut on back of RH cab
marker light base.
(15) Install RH cab marker light base on vehicle
with four screws.
(16) Install RH cab marker light lamp in socket.
(17) Install lens cover on base with two screws.
(18) Install gasket on RH cab marker light base.
(19) Connect marker light connector to
connector P131.
(20) Install lockwasher, terminal lug TL131,
lockwasher, and nut on back of base.
(21) Install RH door marker light base on vehicle
with four screws.
(22) Install RH door marker light lamp in socket.
(23) Install lens cover on base with two screws.
Change 1
|
|
Privacy Statement - Press Release - Copyright Information. - Contact Us |
